

Inspired by fabric backed bookcases and staircases on Pinterest, I decided to cover the backs of these display cases with fabric before hanging them. This easy project can be finished in a night, including shopping time for the materials. I bought my fabric from Joann’s (in the home decor section.) Always use a coupon or buy on sale! My fabric was 50% off plus I had a 10% off coupon so it only cost me $10. My display cases were also on sale/clearance when I bought them. Two were on clearance at Michaels and the other three I found at a thrift store. I love thrifty shopping!

Here’s the steps to make your own fabric backed display cases:
Materials:
1 yard of fabric/combination of fabrics
Display cases
1 yard of single sided fusible interfacing, midweight
Scissors
Double sided tape - ¼” wide
Metal ruler
Exacto knife and extra blades

Step one: Center your 1st box over your fabric so the pattern is centered. Cut around the box, leaving about an extra inch of fabric around.
 Step
two: Cut your fusible interfacing to the same dimensions as your
fabric. I used a single sided fusible, midweight interfacing. Trim an
extra ⅛” on all sides so your interfacing is smaller than your fabric.
(This will keep you from accidentally ironing it to your ironing board.)
Step
two: Cut your fusible interfacing to the same dimensions as your
fabric. I used a single sided fusible, midweight interfacing. Trim an
extra ⅛” on all sides so your interfacing is smaller than your fabric.
(This will keep you from accidentally ironing it to your ironing board.) 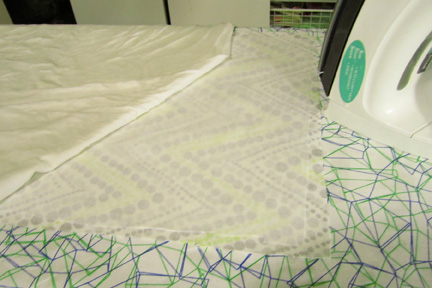
Step
three: Set your iron to a steam setting and get your press cloth damp.
A clean white cotton t-shirt works just fine. Follow the instructions
for your fusible interfacing, but make sure you place the adhesive side
face down on the wrong side of your fabric.
 Step
four: Grab your double sided tape (1/4” wide) and tape the back edge
of your box. Keep the tape about an ⅛” from the edge. Put your fabric
face up on your work space. Line your box so your pattern is centered
and straight and press firmly down to adhere the fabric to the tape.
Carefully flip your box over and smooth your fabric over the edges of
your box so it’s taut and smooth.
Step
four: Grab your double sided tape (1/4” wide) and tape the back edge
of your box. Keep the tape about an ⅛” from the edge. Put your fabric
face up on your work space. Line your box so your pattern is centered
and straight and press firmly down to adhere the fabric to the tape.
Carefully flip your box over and smooth your fabric over the edges of
your box so it’s taut and smooth. 

Step five: Get your metal ruler and a sharp exacto knife. Have some spare blades on hand as you need a very sharp blade to slice through the fabric. Line your ruler up about ⅛” from the edge and carefully, but firmly run your blade along the ruler. You should be able to cut through with one pass. Continue on all sides and remove your excess fabric. You may need to clean/trim frayed ends of your fabric. If your box has metal hangers on the back, you’ll have to cut the fabric with scissors across that part, as the metal dulls the exacto knife. You will also want to trim the fabric away from the hanger holes so you can easily hang your display boxes.

Step six: Admire your handiwork and find a great spot to hang them.
I”ll post pictures after I hang mine and fill them up!
No comments:
Post a Comment