On to part two of designing a baby blanket!
I bought my yarn yesterday night - it's so soft, I love it! The yarn is Patons Beehive Baby Chunky (with the brown in Bernat cotton tots. They only had four colors and I needed another color for the beak and feet so I had to get a different brand of yarn.)
I made up a few swatches in half double and single crochet in different hook sizes. It's a bit chunkier than I usually work with, so I've decided to do single instead of half-double crochet stitches. Then I got down to measuring.
I figured out my gauge, 12 stitches per 4 inches, 14 rows per 4 inches which breaks down to 3 sts/1" and 3.5 rows/1". I want my blanket to be 30" across by 40" tall and I'm planning on a 2 1/2" border - in case my blanket doesn't come out exactly the right size, I can adjust the border to achieve my desired measurements (ex, too short - just add a few extra rows to the top and bottom of the border.) So minus the border, I'm looking at a 25" by 35" blanket.
To find out my overall stitches and rows, I take my 25" across times 3 (3 sts per1") = 75sts across. Doing the same for the height, 35" tall times 3.5 (3.5 rows per 1") =122.5 rows tall.
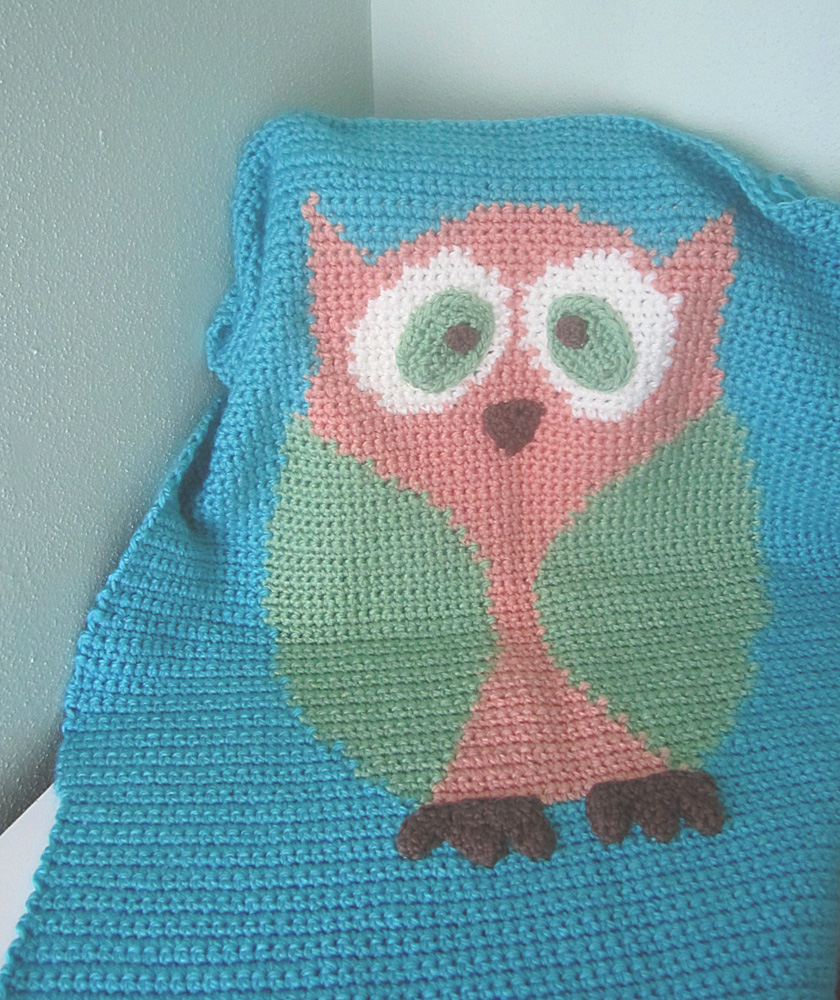
Now I want to find out my graphed owl measurements. My graphed owl is 7 1/2" across by 9 1/2" tall. I'd like to double the size of that, so my finished owl should be 15" across by 19" tall. So
15"x3=45 sts across and 19"x3.5= 66.5 rows tall.
Since my blanket is 25" across and my owl is only 15" across, I have 10" left over, or 5" on each side. 35" tall - 19" tall (owl size) = 16" left over, or 8" of extra blanket on the top and bottom. Again, 5"x3(3 sts per 1") = 15 sts on each side of the owl and 8"x3.5 (3.5 rows per 1") = 28 rows on top and bottom of the owl.
Another way to do this is to take your total stitches minus your owl stitches and divide by two. 75-45=30/2=15 stitches Do the same for the rows. 122.5-66.5=56/2=28 rows
Here's a visual example:
The last step is figuring out what your graphed squares equal - it'd be amazing if 1 square equaled 1 st (or even 2sts) but that never seems to happen. Count how many squares across your drawing is, mine is 30 squares across. Count how many squares tall your drawing is, mine is 38 squares tall. So, if I need 45 sts to make my owl 15" across, then 45 sts / 30 squares = 1.5 sts per square. 66.5 rows / 38 squares = 1.75 rows per square. To make it easier to graph - every 2 boxes across = 3 sts (1.5 sts x 2 boxes = 3 sts) and every 4 boxes high = 7 rows (1.75 sts x 4 boxes = 7 rows)
I want my pattern to be as precise as possible (if I want to do it again, I know I'll get the same results) so I always draw new graph lines in, to represent each stitch and row. Every two boxes I divide into thirds and every four boxes tall I divide into 7 rows. I also mark where every 7th row ends and which direction I should be going on that row, so I don't get confused.
It's a lot of boxes, and a bit intimidating, but I made the owl in really simple shapes, so I think I will be ok. I'm going to crochet the beak, feet, and irises separately and stitch them on at the end.
Here's a few ways to make this simpler, and reasons why I'm not doing them.
- Make your graph squares equal 1 sts/1 row or 2 sts/2rows.
- My single crochet stitches are not exactly equal in height and width, so I would end up with a short and fat owl. If your stitches and rows are equal, this would be an easy way to go.
- If I did a 1 to 1 ratio, my owl wouldn't be twice as big as my drawing, maybe only 3/4 bigger. If I did a 2/2 ratio, my owl would be more than 2 times bigger (each square only equals 1.5 sts, so 2 sts would make it a monster.) If you aren't concerned about an exact size, this would work for you.
- My blanket wouldn't end up the exact size I want it, or I'd have to adjust the background sides and top/bottom rows to make it work. I admit, I'm a perfectionist and I want this blanket to turn out as close to my plans as possible, hence my willingness to divide my graph into teeny tiny squares.
- Round your measurements up or down to easier to work with numbers (i.e. instead of each square equaling 1.75 rows, make it 1.5 or 2 rows)
- Your end piece will end up skinnier or fatter than you want, unless you compensate while working on it - adding or subtracting rows every now and then to make up for your adjustments - and that makes my head hurt just thinking about how to do that.
- Don't draw the new graph lines on your square - just wing it while keeping in mind that every two squares equal 3 sts and every 4 squares equals 7 rows (or whatever your measurements are.)
- Even though it is sometimes hard to keep track of what row/sts I'm on, I find it easier to have it already drawn out. I'm more consistent with my color changes and I can reproduce my work again with more accurate results. It's also less to think about while working.
Here's a visual of all of my measurements:
I will report back with my progress, but first I have to chain 75 stitches and work 28 rows of single crochet in my background color before I can start on the owl - sigh - it's going to be a long night.


.JPG)
.JPG)